In today’s technological era, having a basic knowledge of Photoshop is a must for all kinds of professions. It helps various business houses, artists and developers to create sophisticated designs quickly. Due to its variety of technical tools, it may seem difficult at first, but believe me, it is so easy that even a beginner can start using in little to no efforts.

If you want to learn adobe photoshop, then we are going to provide adobe photoshop CC tutorials that will allow you to make effective use of adobe photoshop. Here’s the complete guide on how you can use Adobe Photoshop to create professional ads, banners, and graphics for your business.
An Overview of the Adobe Photoshop
Before moving on to the nitty-gritty of Adobe Photoshop, it becomes important for you to have some basic information about Adobe Photoshop. Just like other programs, you’ll find different menu bars along the left and right side of Photoshop.
In the left bar, you’ll see some useful tools which you can use to perform editorial tasks. On the right side, you’ll find the color tool and layers panel. All these tools are designed to perform different editorial functions.
You also like: Best Affordable Alternatives of Adobe Photoshop
How to Open a Document in Adobe Photoshop?
- Tap on the File option located at the top menu bar.
- Select New from the available options.

- This will display a dialog box on your screen.
- In the dialog box, you’ll be provided with custom settings.
- You have to name your document, adjust its height and width and set its resolution.
- You can decide the height and width of the document as per your own preferences.
- For resolution, you can set it to 72 pixels/inch for online images and 300 pixels/inch in case you want an image for printing purposes.
- Tap on the OK button.
- Now, you will see a layer appearing in the layer panel.
- You’ve to double-click on the layer to unlock it so that you can make further changes to it.
An Overview About Adobe Photoshop Technical Tools
In adobe photoshop, most of your time will be spent while experimenting with the technical tools. It comes with a plethora of technical tools. All of these tools can be divided into different categories based on their usage. Let’s discuss the main categories as follows:
1. Slicing & Cropping Tools
The first set of tools include slicing and cropping tools. These tools allow users to select and cut the parts that they don’t want to include in an image.
2. Retouch & Paint Tools
The second set of tools contains drawing, paint and retouch tools which can be used to draw shapes & objects in a document. Along with this, you can also use the paint tool to add color to the shapes that you’ve drawn using the drawing tools.
3. Typing & Measurement Tools
The third set includes some important typing & measurement tools which you can use to type text in a document. The measurement tools are provided so that you can move the shapes drawn in a document.
Learn Adobe Photoshop to Know the Use of Layer Panel
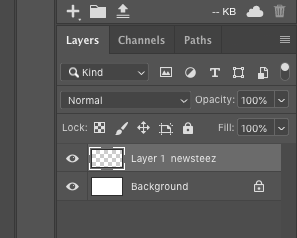
Did you tried to fill color to an object on your document, but it got added to the background? If this happened to you, then you really need to have some basic understanding of the layers panel. You might have noticed an addition of a new layer to the layers panel whenever you add a new object to a document.

This happens because each one of the layers in the layer panel represents different objects in a document. So, Next time, before making any changes, click on the layer representing an object to which you want to make a change. You can also name your layers in order to avoid any confusion.
In order to name a layer, all you have to do is just tap twice on a layer, type in the name and tap OK. This way, you can give a layer a name so that you can recognize it easily.
Adobe Photoshop CC Tutorials to Use the Type Tool
The Adobe Photoshop Type Tool is primarily designed to type words in a photoshop document. Here, we have provided a step by step guide on how you can use it to type text in a photoshop document:
- Tap on the “T” icon representing the type tool that you can find in the left toolbar section.
- Once you’ve selected it, tap anywhere on the photoshop document.
- You’ll start seeing some options to type text.
- Apart from this, you’ll also see some additional options like font size font type, etc.
- You can make use of these options to select the font type and font size.
- After making adjustments, all you have to is just start typing whatever you want in a document.
Photoshop Step by Step Tutorial to Use Gradient Tool
A gradient effect is a transition effect produced by blending one or more different colors. You can use the gradient effect to give an instant professional look to your document. If you are a photographer, then you can use gradient effects to give your background a catchy look.
Here’s how you can use the Gradient tool to make your backgrounds look catchy and cool:

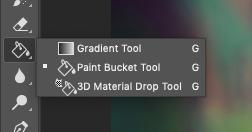
- Select the Gradient tool.
- Press the paint bucket icon and hold it for a while.
- Tap on the color swap located at the top to view the available presets.
- Click on any one of the gradient effects to apply it to your document.
- If you want to make any adjustments to the available presets, then double-tap on any of the preset.
- You’ll start seeing some additional settings on your screen.
- Once you’ve made enough changes, tap OK.
- Now, click anywhere on your document.
- Hold your mouse until you’ve found an ending point.
- Release the mouse to a place where you want the gradient effect to end.
- Photoshop will add a gradient effect onto the selected document.
Online Photoshop Tutorial to Learn About the Pen Tool
The pen tool allows you to draw shapes and objects. It comes in four different variants which include the standard pen, Curvature pen, and freeform pen. All of them are designed to perform different functions. In order to use the Pen tool, all you have to do is tap the Shift+P keys on your keyboard.
Now, click anywhere on the document and you’ll see an anchor point there. You can create anchor points in the way you want the curves to appear in your shape.
If you want to draw curved lines, firstly add a straight line while holding the shift button. Now, add a second anchor point on the document and drag the mouse in the opposite direction. Now, you’ll see a C-shaped figure on your screen.
Adobe Photoshop CC Tutorials to Use the Lasso Tool
The lasso tool lets you select some parts of an object so that you can either edit or enhance them. There are three different types of lasso tools available which include Standard, Polygonal and Magnetic lasso. We recommend you to use the Magnetic lasso tool so that you can make a better selection of an object. Here’s how you can use the Magnetic Lasso tool:
- Tap and hold the lasso tool to see additional options.
- Select the Magnetic Lasso from the available options.
- Now, click on any of the edges of the object.
- Hold the mouse and start tracing the object.
- Release the mouse when you’ve successfully traced the part that you want to select.
- As soon as you’ll release the mouse, Photoshop will create a selection for you.
- Now, you can either cut, edit, or enhance the selected part of the object.


No Comments
Leave a comment Cancel