Since the last decade, a lot of editing tools came and got extinct, but Photoshop always remained on top. The thing which made it popular among graphic designers was the huge variety of tools it provided to them. With the help of Photoshop, it’s really easy to make your photos look professional.

Sharpening is one of the quickest ways to make your photos look professional. The best part is Photoshop even has a sharpening tool called Smart Sharpen. In this article, we are gonna share a step on step guide on how one can use the Smart Sharpen tool to get better results.
You also like:
The Complete Beginner Guide For Photoshop CC
Best Affordable Alternatives of Adobe Photoshop
So, let’s get started Use the Smart Sharpen Tool in Photoshop
Step 1. Convert an Image Layer into a Smart Object
- Upload the image you want to sharpen to Photoshop.
- Once uploaded, it will start appearing in the layer panel.
- Click on it to select it.
- Then, tap on the menu icon located at the top-right corner.
- Select Convert to Small Object from the available options.
- Now, you’ll see a small object icon along with the original layer.
Step 2. Select the Smart Sharpen Tool

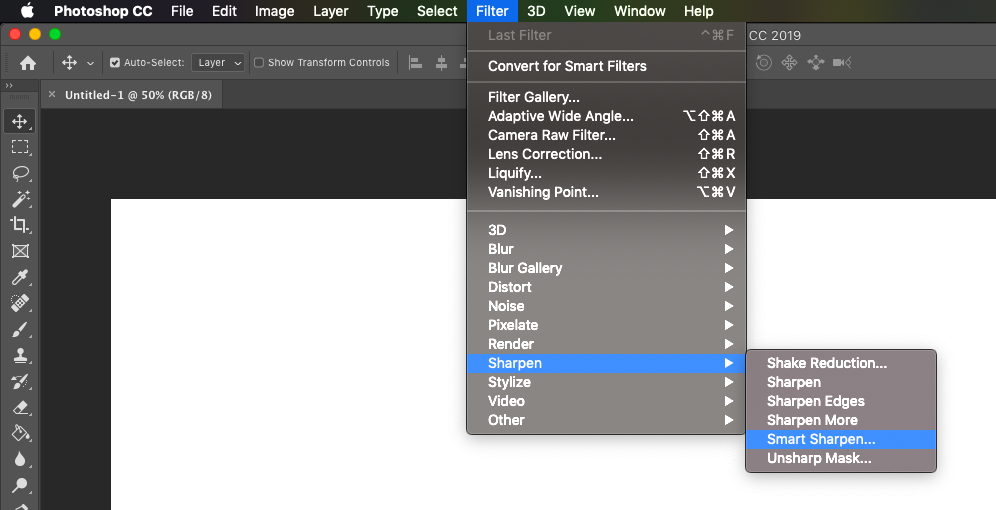
- Go to the Menu bar.
- Tap on the Filter tab.
- Click on the Sharpen and then select the Smart Sharpen option.
- This will open the Smart Sharpen dialog box.
- Now, you’ll see the image in the preview area.
- You can either zoom in or out using the plus and minus icons.
Step 3. Resize the Smart Sharpen Dialog Box
- Click on the sides of the preview screen.
- Then, drag and adjust the same as per your own preferences.
- Once you’ve resized, then drag the image and adjust it into the center of the preview screen.
- It’s done.
Step 4. Make Some Additional Settings
- In order to detect edges, you’ve to change the Remove option to Lens Blur.
- Increase the Contrast of the image edges.
- Use the Amount slider and set it to 200% in order to change the Contrast level.
Step 5. Use the Mouse Toggle to Turn the Sharpening On and Off
- The Sharpening tool also allows you to toggle the preview screen.
- By doing this, you can see the difference between a non-sharpen and a sharpened image.
- Click and hold your mouse on the preview screen to see the original image.
- Release the mouse button to see the sharpened image.
- Doing this will allow you to make a difference and sharpen images as per your own preferences.
Step 6. Add Thickness to Image Edges
- You can use the Radius option to add thickness to an image.
- By default, it is set to 1 Pixel.
- You can adjust it to make the edges thicker.
For example, if you add 2 pixels value to the radius, then it will make your image edges thicker by 4 pixels, 2 pixels for the light and 2 for the dark area.
- The best radius value would range anywhere between 1 to 3 pixels.
- You can experiment on which value works best for you.
Step 7. Reduce Noise to Clean Up the Image
- In the smart sharpen dialog box, you’ll find a Noise option.
- You can use this option to remove noise from the image.
- By default, it is set to 10%, but you can experiment on which value works best for you.
Step 8. Make Adjustments in the Shadows & Highlights
- Under the Shadows & Highlights section, you’ll find some additional options.
- By default, the fade value is set to 0% and it can be used to fade the sharpening effect.
- Keep Fade Value to 0% as it works best.
- You can keep the Tonal Width to 50% for the best results.
- For radius, you can try increasing it to 50 pixels to see some difference.
Step 9. Apply the Changes and Alter the Blend Mode to Luminosity
- Once you’ve applied enough changes, tap OK to apply the changes.
- Now, you’ll require to change the blend mode to Luminosity.
- In order to do that, go back to the layers panel.
- Under the smart sharpen filter, you’ll see a blending options icon.
- Tap on it.
- In the blending options dialog box, change the Mode to Luminosity.
- Click OK to apply the changes.

